I set up Frigate NVR in my basement rack today, and I’m writing this down while the details are still fresh. If you want AI-powered object detection on your security cameras without paying monthly fees to a cloud provider, Frigate is worth the time investment. It’s self-hosted, open source, and it works remarkably well once you get past the initial Docker and config hurdles.
Why Frigate NVR Matters (And When It Doesn’t)
Most security camera systems record everything, all the time. That means your storage fills up fast and you’re swimming through hours of footage looking for the one minute something actually happened. Frigate changes that equation. It uses a Google Coral TPU or your CPU to run object detection on your camera streams in real time, so it only triggers recordings when it sees a person, car, animal, or package.
That’s the appeal. The catch is that it requires a bit of infrastructure to run properly. You need Docker, you need to understand YAML config syntax at least a little, and if you want the AI detection to be snappy, you need hardware that can handle it. If you’re already running a homelab, though, this is the kind of thing that makes sense to have running in the background.
I’m running this on an old Intel NUC with an i7 and 16GB of RAM. No Coral TPU yet—I’ll probably add one later if CPU usage gets annoying, but it’s handling four 1080p camera streams without breaking a sweat so far.
Prerequisites and Hardware
Before you start, make sure you have these things in place:
- A Linux host or NAS running Docker and Docker Compose. I’m on Ubuntu 22.04, but Debian, RHEL-based systems, or even Synology NAS work fine.
- At least 8GB of RAM, though 16GB is comfortable if you’re running other services.
- CPU cores to spare. One core per camera is a rough rule of thumb if you’re not using a Coral TPU.
- Storage. A fast SSD or NVMe for the database and cache, and a separate large drive for recordings. I’m using a 2TB SSD for recordings, which gives me about two weeks of continuous capture at 1080p.
- Network cameras that can stream RTSP or HTTP. IP cameras like Hikvision, Reolink, or UniFi work out of the box. Consumer cameras like Wyze or Ring need additional bridges.
- Optional: a Google Coral TPU. USB Coral runs around $60 and speeds up object detection significantly. I don’t have one yet and it’s fine, but if you’re hitting CPU limits, it’s worth it.
- Home Assistant (optional). Frigate has a tight integration with Home Assistant that makes notifications and automations much easier. Not required, but nice to have.
Installing Frigate NVR with Docker Compose
I’ll assume you already have Docker and Docker Compose installed. If not, get those running first.
Start by creating a directory for your Frigate config and data:
mkdir -p /opt/frigate/config
mkdir -p /opt/frigate/storage
cd /opt/frigate
Now create your docker-compose.yml file. This is where most of the magic happens:
version: '3.8'
services:
  frigate:
    image: ghcr.io/blakeblackshear/frigate:stable
    container_name: frigate
    privileged: true
    restart: unless-stopped
    shm_size: '256mb'
    environment:
      - LIBVA_DRIVER_NAME=i965
    volumes:
      - /opt/frigate/config:/config
      - /opt/frigate/storage:/media/frigate
      - /etc/localtime:/etc/localtime:ro
    ports:
      - "5000:5000"
    devices:
      - /dev/dri:/dev/dri
    networks:
      - frigate-network

  redis:
    image: redis:7-alpine
    container_name: frigate-redis
    restart: unless-stopped
    networks:
      - frigate-network

networks:
  frigate-network:
    driver: bridge
A few notes on this file. The shm_size setting is important—it sets shared memory for the video processing. 256mb is reasonable for 4-6 cameras. If you’re running more than that, bump it to 512mb or higher. The /dev/dri device gives Frigate access to your GPU for hardware video decoding, which is a nice win if you have Intel graphics. On AMD, you’d change the driver to radeonsi. On Nvidia, you’d add the Nvidia runtime instead.
Create the base config file at /opt/frigate/config/config.yml. This is your camera definitions and detection settings:
logger:
  default: info

database:
  path: /config/frigate.db

detectors:
  cpu:
    type: cpu

cameras:
  front_door:
    ffmpeg:
      inputs:
        - path: rtsp://192.168.1.50:554/stream
          roles:
            - detect
            - record
    detect:
      width: 1280
      height: 720
      fps: 5
    motion:
      mask:
        - 0,0,1280,0,1280,400,0,400
    record:
      retain:
        default: 7
        motion: 14

objects:
  track:
    - person
    - car
    - dog
    - cat
    - package
Let me break this down because it’s the part that took me the longest to get right. The detect section sets the resolution and FPS for the AI detection stream. Lower FPS saves CPU—5 FPS is usually plenty for security purposes. The motion mask uses polygon coordinates to exclude areas you don’t care about (sky, trees, whatever). The record section controls how long video gets stored, with different retention for motion-triggered clips versus default background recording.
Now start the containers:
docker compose up -dGive it a minute to pull the image and start up. Check the logs:
docker compose logs -f frigateYou should see it pulling the model files and initializing. That first run takes a bit. Once it stabilizes, hit http://localhost:5000 in your browser and you should see the Frigate web UI.
First-Run Configuration and Camera Setup
The web UI is where you actually see what’s happening. The dashboard shows live feeds, clips, and stats. But before you celebrate, you need to make sure your cameras are actually connected and detecting properly.
Add your cameras one by one. If your camera URLs aren’t working, here’s what I learned: RTSP is the easiest protocol to work with, but you need to know the exact stream URL for your model. Hikvision cameras usually use something like rtsp://user:pass@ip:554/Streaming/Channels/101. Reolink is rtsp://user:pass@ip:554/h264Preview_01_main. Check your camera manual or manufacturer docs if you’re not sure.
Test the stream from your host before adding it to Frigate. This saves a lot of debugging time:
ffprobe rtsp://user:[email protected]:554/stream 2>&1 | grep -i streamIf that works, the camera should work in Frigate. If it doesn’t, the problem is your network or camera config, not Frigate.
Once cameras are live in the web UI, check CPU and memory usage. SSH into your host and run docker stats. On my setup with four 1080p cameras and CPU detection, I’m sitting around 30-40% CPU usage. If you’re seeing high numbers, reduce the detection FPS or resolution in config.yml.
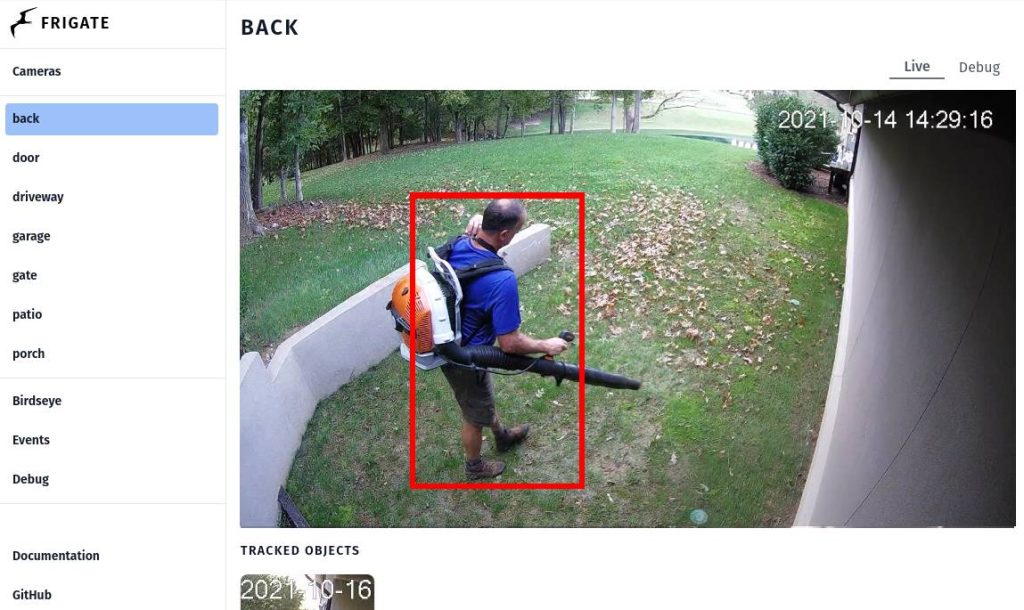
The object detection starts working automatically once cameras are connected. You’ll see boxes around detected people, cars, animals on the live feed. This is running locally on your hardware, not in the cloud. That’s the whole point.
Common Gotchas and Fixes
I hit several snags during setup and I’m going to save you the time.
Shared memory errors. If you see Bus error or Segmentation fault in the logs, your shm_size is too small. Increase it to 512mb or 1gb in docker-compose.yml and restart.
RTSP stream drops or timeouts. Some cameras timeout after a few hours. Add keep-alive settings to your ffmpeg input config:
inputs:
  - path: rtsp://192.168.1.50:554/stream
    input_args: -rtsp_transport tcp -rtsp_flags listen
    roles:
      - detect
Detection isn’t working or very slow. Check that you’re actually using a detector. If no Coral TPU, CPU detection is the fallback and it’s CPU-intensive. For four cameras, it should work but it’ll use one full core. If it’s unusably slow, either add a Coral TPU, reduce the detect FPS, or add a second camera at lower resolution.
Storage fills up fast. The default retention settings can eat disk space. I went with 7 days continuous recording and 14 days for motion clips. Tune the record.retain section based on your storage size and needs.
Home Assistant integration doesn’t show cameras. Make sure the Frigate integration is installed and the IP address in the config is correct. It’s not automatic. Restart Home Assistant after adding Frigate.
Integrating with Home Assistant and Automations
This is where Frigate becomes useful instead of just interesting. Once it’s running, add the Frigate integration to Home Assistant. In Home Assistant’s web UI, go to Settings → Devices & Services → Integrations → Create Integration → search for Frigate.
You get entities for each camera, plus entities for detected objects. I use this to trigger notifications when a person is detected at the front door, and to create automations like turning on porch lights when motion is detected after sunset.
Example automation in Home Assistant YAML:
- alias: Front door person alert
  trigger:
    platform: state
    entity_id: binary_sensor.front_door_person
    to: 'on'
  action:
    - service: notify.mobile_app_phone
      data:
        message: "Person detected at front door"
        data:
          image: /api/frigate/front_door/thumbnail.jpg
The real power here is that Frigate is doing the heavy lifting on your local hardware, and Home Assistant is orchestrating the responses. No cloud dependency, no third-party API calls, no monthly bill.
Storage, Backups, and Ongoing Maintenance
After a week of running, I’m seeing consistent storage usage and some patterns worth knowing about.
Your database file at /config/frigate.db grows over time as it logs all the detections. After a month, mine was about 50MB. Not huge, but worth backing up. The recordings themselves are the real storage hog. A 2TB drive with continuous 1080p recording at 6 Mbps gets you maybe 14-18 days before it starts deleting old footage.
Set up a backup. I’m backing up the entire /opt/frigate directory to a NAS weekly using rsync. The database and config are small, so even if your recordings get wiped, you can restore and start recording again without losing your setup.
One thing that surprised me: Frigate does its own cleanup. You don’t have to manually delete old recordings. It respects the retention rules you set and purges old files automatically. That’s good design.
Periodically check the logs for errors or warnings. CPU thermal throttling is a real issue if your host doesn’t have good cooling. I moved my NUC to a better-ventilated spot and CPU temps dropped 15 degrees.
What to Do Next
You’ve got Frigate running and detecting objects. From here, the path depends on what annoyed you most about your existing security setup.
If latency matters (you want to see live footage fast), look into hardware video decoding. If false alerts are killing you (wind blowing trees, shadows), spend time tuning detection masks and object filters. If you want mobile notifications, integrate it fully with Home Assistant.
If you’re running only CPU detection and it feels sluggish, the Coral TPU is the next logical upgrade. It’s cheap and it works. Other than that, Frigate is pretty hands-off once it’s configured.
The one thing I haven’t figured out yet is whether I actually need all this. I have five days of footage now and I’ve watched maybe 30 seconds of it. That’s fine—the point was having it available if something happens, not having to watch everything. But I’m two weeks in and the system hasn’t failed, logs are clean, and storage is stable. It works.
FAQ
Can Frigate NVR run on a Raspberry Pi?
Yes, but barely. A Pi 4 with 8GB can run Frigate with one or two 1080p cameras using CPU detection, but it’ll be slow. Add a Coral TPU and it becomes usable. Most people use an Intel NUC or old PC instead because the performance-per-dollar is better.
How much RAM does Frigate NVR need?
Minimum 4GB, comfortable at 8GB, optimal at 16GB for multiple cameras. Each camera adds memory overhead, especially for buffering streams. If you’re running other services on the same host, 16GB is safer.
Do I need a Google Coral TPU for Frigate NVR?
No. CPU detection works fine for most homelabs, especially with 4 or fewer cameras. A Coral TPU is about $60 and speeds up detection significantly, but it’s optional. Add one later if CPU usage becomes a problem.
What’s the difference between Frigate NVR and Shinobi or ZoneMinder?
Frigate is newer, lighter weight, and has built-in AI object detection. Shinobi and ZoneMinder are older, more feature-complete, but heavier on resources and require more manual configuration. For modern homelabs, Frigate is the simpler choice.
Can Frigate NVR work without Home Assistant?
Yes. Frigate is standalone and has its own web UI and API. Home Assistant integration adds smart notifications and automations, but it’s optional. You can use Frigate by itself if you just want a local NVR with AI detection.
Explore Frigate NVR in our AI Homelab Toolkit.