
Untangle Overview
Untangle NG Firewall is a network security application. The home web site is at https://www.untangle.com/untangle-ng-firewall/. Untangle NG version 16.5.1 has been successfully installed and deployed on the FW2B, FW4B, FW6 series, and VP series of the Vault.
Note: Please see the BIOS Compatibility at the bottom of this article before starting the installation.
Additional Note: It is highly recommended to install Untangle on a completely wiped/empty drive, as multiple partitioning errors can occur during the installation process if trying to overwrite another operating system
Verify Hardware Recommendations
Before installing Untangle NG, verify that the Vault has been equipped with the appropriate hardware. See the hardware requirements as published by Untangle at https://wiki.untangle.com/index.php/Hardware_Requirements
Install Untangle
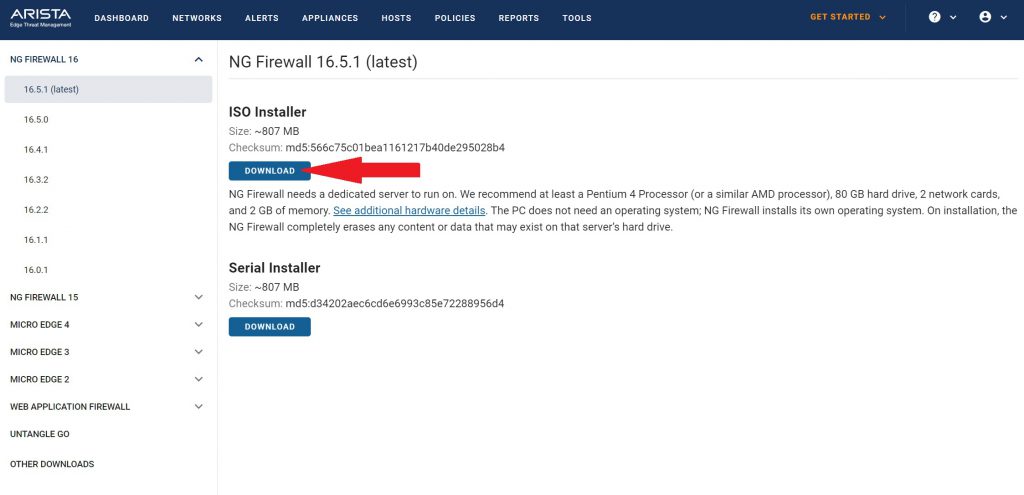
Obtain the Installation Image
The Untangle installation image can be downloaded from: https://www.untangle.com/cmd/download/ng-firewall/16.5.1. You must create an account before downloading, which can be done here: https://www.untangle.com/cmd/login/create-account
The VP4600 Series can only install Untangle via the Serial Installer image. The ISO installer can be used to install Untangle on any of the other Vault platforms. It is important to choose the correct image type to install via USB on The Vault. As of the writing of this article, the latest version that has been tested with The Vault is version 16.5.1 of Untangle.
Version: 16.5.1
Image type: ISO Installer
Burn the Installation Image to a USB Drive
The easiest way to transfer the installation image to a USB drive is by using software called “Rufus” on Windows or “balenaEtcher” on Mac OSX. See this link for detailed instructions on how to create a bootable USB drive using Rufus or balenaEtcher.
If using Rufus “ISO mode” should be selected.
Precautions when installing Untangle on the VP2410/VP4600 Series
VP2410 Specific Notes
**If you have coreboot BIOS, you may be unable to install the GRUB bootloader
Towards the end of the installation process, a message will appear stating, “An installation step failed. You can try to run the failing item again…The failing step is: Install the GRUB boot loader on a hard disk”
Press ‘Continue’, select ‘Continue without boot loader’, then press ‘Continue’ again. The installation will continue.
** On the VP2410 with AMI BIOS, you must disable the on-board eMMC storage to successfully install the operating system
Disabling eMMC on the VP2410:
Hold the delete key as you boot the Vault to open BIOS settings, then navigate to the “Chipset” options at the top. Select “South Cluster Configuration”.
Choose ‘SCC Configuration’, and disable the SCC eMMC Support. Be sure to save your settings afterwards.
You may then continue with the normal installation process by following the steps outlined in the next section, “Install the Operating System”.
VP4600 Series Specific Notes
The 10th Generation Intel UHD integrated graphics is not supported for Untangle. You will receive video errors if you install with the ISO installer, so you must install the serial version if you wish to use Untangle with the VP4600 Series. You can still follow all the same installation instructions found on this page, but you will need to be connected via the serial port using a serial console like PuTTY.
If you do not want to install the OS on the on-board 16GB eMMC storage, it is recommended to disable access to the eMMC before installation for a smoother installation process. You can enable it again after installation of Untangle.
Disabling eMMC on the VP4600:
Hold the delete key during boot to open BIOS settings, then navigate to the “Chipset” options at the top. Select “PCH-IO Configuration”.
Choose “SCS Configuration” , and disable eMMC 5.0 Controller. Be sure to save your settings afterwards.
Installing the Operating System
- Verify The Vault is powered down
- Verify the monitor is connected (Or serial cable if doing a serial install)
- Verify the USB keyboard is plugged in
- Connect the Vault to the network via the WAN port that is connected to a network with DHCP enabled
- Note: Untangle downloads files from the internet during installation
- Power on the Vault and hold F11 during boot to select your USB drive
- Select “Install” (It is recommended to NOT select “Graphical Install”)
- Allow installation to continue
- If you are attempting to install the UEFI version and an error message asks if you would like to Force UEFI installation, choose “Yes”
- If a prompt titled “[!!] Partition disks” shows up, Select “Finish partitioning and write changes to disk”
Common Errors (skip this section if no errors are present):
Note: If an error regarding a failed attempt to partition the selected disk/attempt to mount a file system, follow these steps:
- Click “Go Back” until you are on the “Debian installer main menu”
- Select “Partition disks”
- Select “Guided partitioning”
- Select “Guided – use entire disk”
- Select the desired drive to install to
- If you are on a VP2410, do not install to the MMC/SD
- Choose “Finish partitioning and write changes to disk” to continue
If you continue to get a failed attempt to partition the disk, or it seems to keep repeating the same messages, you will need to wipe the drive completely by following the steps outlined under the next note:
Note: If the error “Failed to create a file system. The ext4 file system creation in partition #1 of SCSI (0,0,0) sda failed” appears, follow these steps:
- Choose ‘Go back’, and ‘execute a shell’
- *The next step will wipe your SSD*
- Enter: dd if=/dev/zero of=/dev/sda bs=64M
- If you have multiple SSDs and are trying to install the OS to a specific drive, you may need to change “sda” in the previous command to correlate with whatever drive you are installing Untangle to
- You can use the command: ls -l /dev/disk/by-id to display all disk names (you will see them labeled sda, sdb, sdc, etc.)
- This process can take a variable amount of time depending on SSD size. You will notice the Vault’s HDD light will be on during the process.
- After the command successfully completes you will receive a message along the lines of:
- (Number) records in
- (Number) records out
- On the command line, type and enter: exit
- Choose “Abort the installation”, then “Yes” when asked if you would like to exit
- Reboot the Vault and reattempt the installation from the start
- Follow the prompts on screen to continue the installation and initial configuration
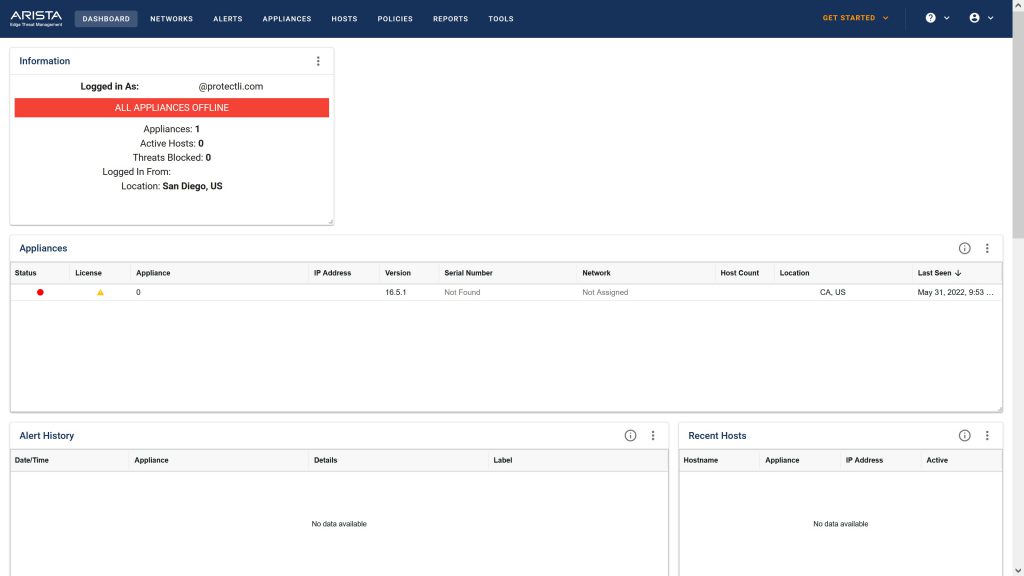
- Verify Untangle is successfully installed
- Verify the Configuration starts
- When configuring Settings, in the Network Card table, note that the port named “External” with device “eth0” is the “WAN” port on the Vault. The port named “Internal” with device “eth1” is the “LAN” port on the Vault.
- The default for the External port IP Address is DHCP
- The default for the Internal port is static IP Address of 192.168.2.1 and is a DHCP server
- Verify the configuration completes successfully
- Select the default applications and verify that they are downloaded successfully
- Verify the Untangle NG firewall dashboard is displayed on the monitor or console used for the installation
- Verify that you can browse to 192.168.2.1 via the “Internal” or “LAN” port and login using the password assigned during the installation
For more information on Untangle, please refer to this https://www.untangle.com/untangle-ng-firewall/ There is a video overview at the end of the page. Here is a link to their Wiki page for additional information at this https://wiki.untangle.com/index.php/Performance_Guide.
At this point, Untangle should be up and running on The Vault. However, If you experience any issues, please feel free to reach out to us at [email protected], or find more information in our Knowledge Base.
| Vault | Untangle Version | Legacy | UEFI | coreboot |
|---|---|---|---|---|
| FW2B | 16.5.1 | Tested | Tested | Tested |
| FW4B | 16.5.1 | Tested | Tested | Tested |
| FW6A | 16.5.1 | Tested | Tested | Tested |
| FW6B | 16.5.1 | Tested | Tested | Tested |
| FW6C | 16.5.1 | Tested | Tested | Tested |
| FW6D | 16.5.1 | Tested | Tested | Tested |
| FW6E | 16.5.1 | Tested | Tested | Tested |
| VP2410 | 16.5.1 | Tested | Tested | Tested |
| VP4630 | 16.5.1 | Failed, use UEFI | Can only use Serial Installer | Tested, use Serial Installer |
| VP4650 | 16.5.1 | Failed, use UEFI | Can only use Serial Installer | TBD |
Recommended Hardware & Hosting
Build your homelab with hardware tested and used by our team.
Affiliate links — we may earn a small commission at no extra cost to you.