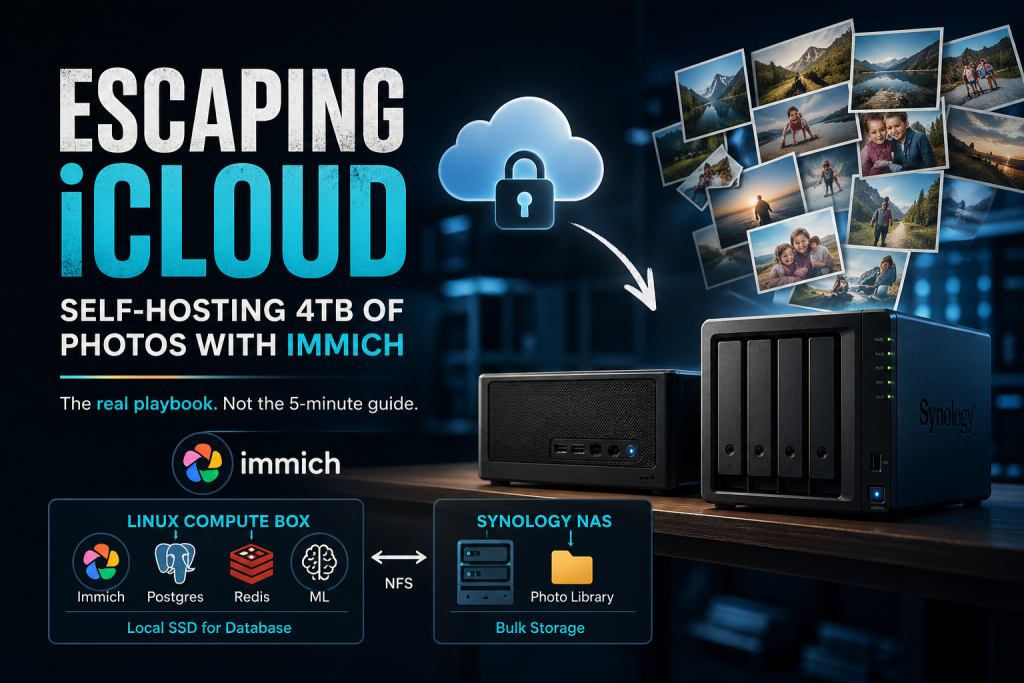
After years of paying for iCloud Photos storage, I moved my family photo library to a self-hosted setup using Immich, a Synology NAS, and a spare Linux box.
This is not a perfect “deploy in 5 minutes” guide. This is the real playbook: what worked, what broke, and what I would do differently.
The Goal
Move away from iCloud Keep the family photo library under my control.
Use existing NAS storage Store photos and videos on the Synology NAS I already own.
Run Immich properly Use a stronger Linux box for compute, ML, face detection, and smart search.
Start local first LAN access now, remote access later through Tailscale.
Architecture Overview
The winning design was simple: separate storage from compute.
Golden rule: Photos can live on NFS. Postgres should not. Keep the database on the Linux box’s local SSD.
Why Not Run Everything on the NAS?
The obvious first idea was to install Immich directly on the Synology. I almost did that, but the DS723+ only had 2GB of RAM.
| Option | Result | Verdict |
|---|---|---|
| Run Immich fully on NAS | Low RAM, ML crashes, slow imports | Avoid |
| Upgrade NAS RAM | Possible, but still limited compute | Okay |
| Use Linux box for compute | More CPU, more RAM, better ML performance | Best |
Why Not Put It in the Cloud?
I briefly considered using a cloud VPS. Then I thought about the data path.
Initial import could take weeks.
Cloud compute looks clean on paper, but for a huge home photo library it creates a slow and expensive architecture.
Step 1 — Reclaim NAS Space First
My NAS was already 81% full. Before importing 4TB of photos, I needed to clean it up.
I used Czkawka, an open-source duplicate finder. The regular Linux build failed because Synology DSM had an older glibc, so the fix was to use the musl build.
sudo ./linux_czkawka_cli_musl dup \
  -d /volume2/Backup \
  -d /volume2/homes \
  -d /volume2/Videos \
  -d /volume2/iMazing \
  -m 10485760 \
  -f /volume2/dup-report.txt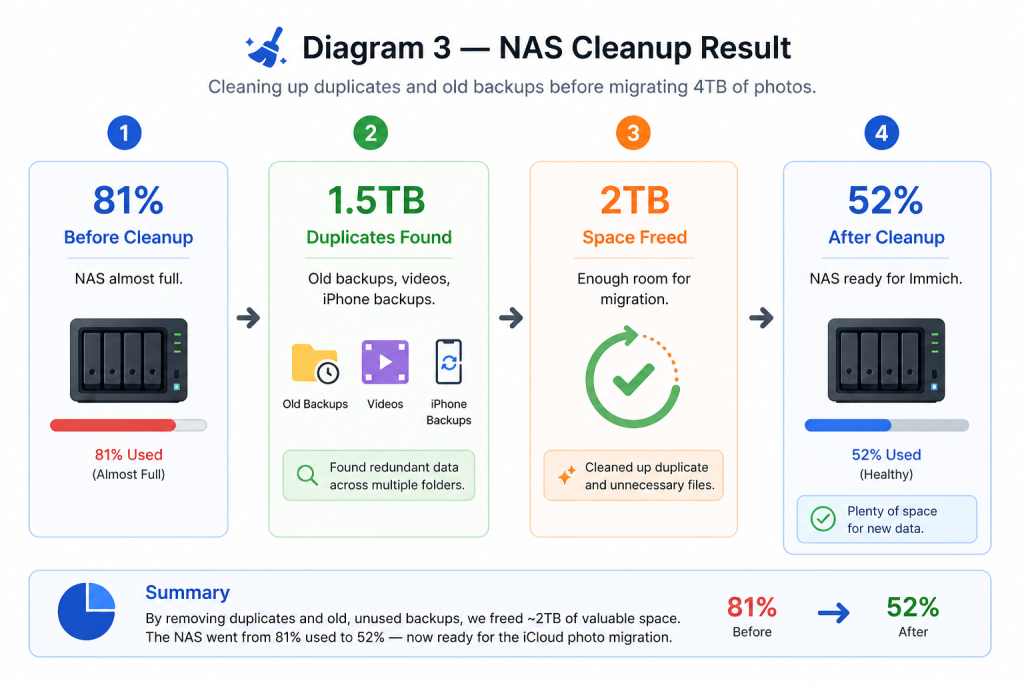
Lesson: Old backups are not always useful backups. Audit them before trusting them.
Step 2 — Export NAS Storage via NFS
On Synology, I created a dedicated shared folder called Immich, enabled NFS, and allowed access from the compute box IP only.
On the Linux box:
sudo apt install -y nfs-common
sudo mkdir -p /mnt/immich-nas
sudo mount -t nfs <nas-ip>:/volume2/Immich /mnt/immich-nas
Then I added it to /etc/fstab:
<nas-ip>:/volume2/Immich /mnt/immich-nas nfs defaults,_netdev,noatime 0 0Make sure the container user can write to the NAS folders. Immich commonly runs as UID 1000.
Step 3 — Deploy Immich with Docker Compose
The compute box already had Docker installed, but I needed the Compose v2 plugin.
sudo apt install -y docker-compose-v2

sudo mkdir -p /opt/immich
cd /opt/immich

wget -O docker-compose.yml https://github.com/immich-app/immich/releases/latest/download/docker-compose.yml
wget -O example.env https://github.com/immich-app/immich/releases/latest/download/example.env

cp example.env .env
The important environment settings:
UPLOAD_LOCATION=/mnt/immich-nas/library
DB_DATA_LOCATION=/opt/immich/postgres
DB_PASSWORD=<random-32-char-string>
TZ=Asia/Dubai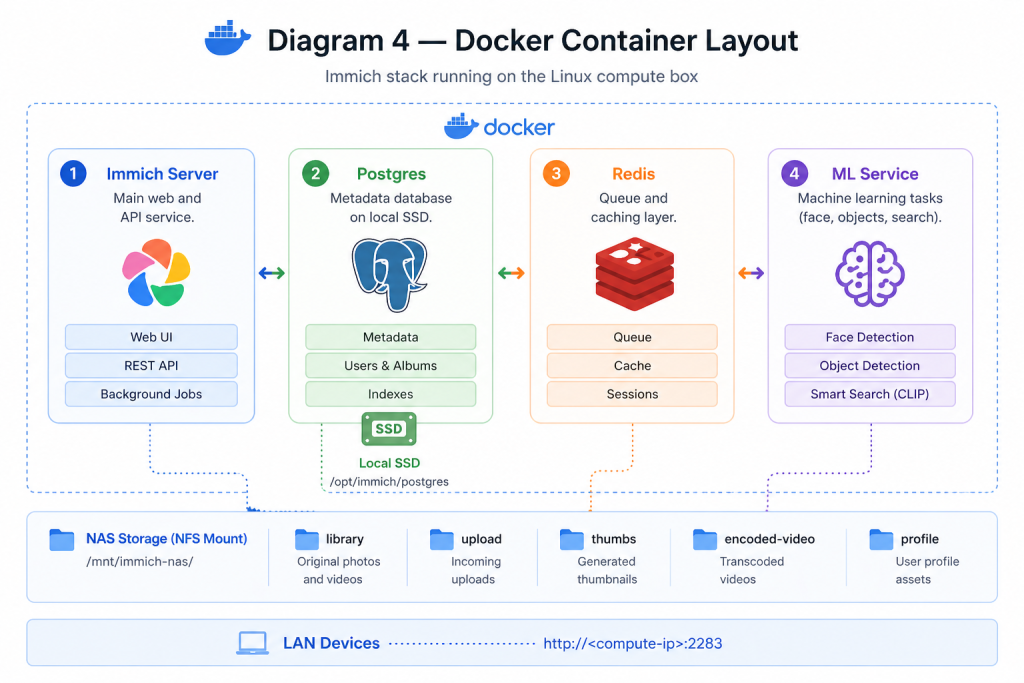
docker compose up -dGotcha — OCR Failed Out of the Box
After uploading my first batch of photos, the machine learning container started returning HTTP 500 errors.
The logs pointed to a failed OCR model download:
DownloadFileException: Failed to download
https://www.modelscope.cn/models/RapidAI/RapidOCR/...
When OCR failed, the ML container became unstable. This affected more than OCR — face detection and smart search also suffered.
The fix was simple:
Disable OCR Administration → Settings → Machine Learning → OCR off.
Restart ML container Let face detection and CLIP search work normally.
Keep smart features Face recognition and smart search are more useful than OCR for most photo libraries.
Step 4 — Import Existing Photos
For importing photos, I used immich-go. It handles batch uploads, deduplication, and Google Takeout parsing.
immich-go upload from-folder \
  --server=http://<compute-ip>:2283 \
  --api-key=<key> \
  --on-errors=continue \
  --concurrent-tasks=4 \
  /mnt/nas-homes/mustafa/Photos
What I learned
| Lesson | Why It Matters |
|---|---|
| Use from-folder when needed | It was more reliable than old Google Takeout parsing. |
| Reduce concurrency | Default concurrency can overwhelm a fresh Immich server. |
| Dedup is idempotent | You can safely rerun the import. |
| Use screen or tmux | Large imports can run for hours or days. |
Step 5 — Pull Photos from iCloud
There are two main ways to pull photos from iCloud.
Option A: Apple Privacy Export Request a copy of your iCloud Photos data from Apple. Slow but safe.
Option B: icloudpd Use the command line to download directly from iCloud. Faster, but requires interactive authentication.
sudo apt install -y pipx
pipx ensurepath
exec bash
pipx install icloudpd
Authenticate first:
icloudpd --username <apple-id> --auth-onlyThen download into a staging folder:
screen -S icloud

icloudpd \
  --username <apple-id> \
  --directory /mnt/immich-nas/icloud-staging \
  --folder-structure "{:%Y/%Y-%m}" \
  --size original \
  --no-progress-bar \
  --until-found 100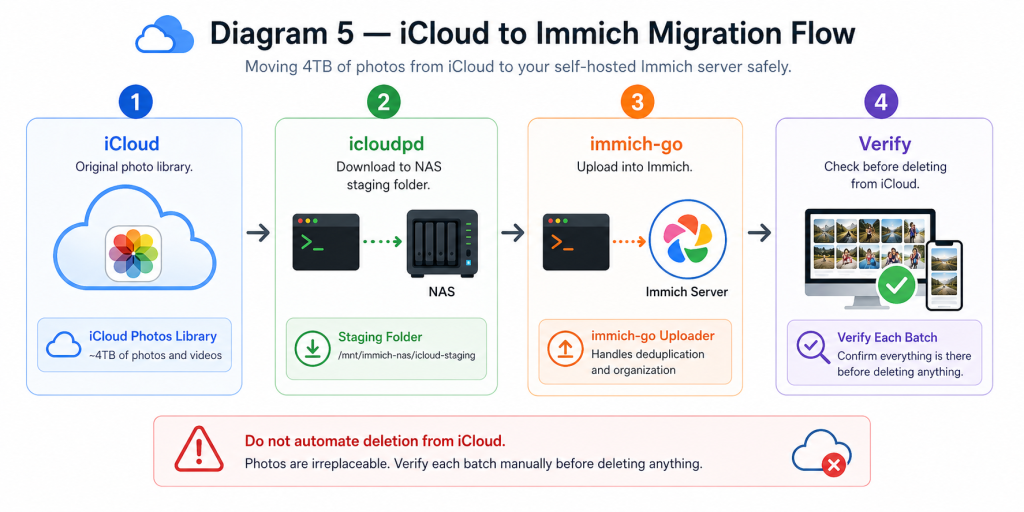
What Comes Next
Install Immich mobile app Point family devices to the local LAN URL and enable auto-backup.
Add Tailscale Access the library remotely without exposing Immich publicly.
Downgrade iCloud Reduce or remove the subscription once trust is built.
Backups Protect both the Postgres database and the photo library.
Final Verdict
Immich is genuinely impressive. The web UI is fast, the mobile app is solid, and the machine learning features are surprisingly powerful for a free open-source project.
The hard part is not running Immich. The hard part is the migration: cleaning old backups, downloading from iCloud, importing safely, and verifying everything before deleting anything.
Once it is running, the library is yours. No subscription, no lock-in, no rate limits, and no dependency on someone else’s cloud.
Next Post
Connecting Tailscale, configuring automated NAS-to-cloud backups for the Immich library, and benchmarking machine learning jobs on different hardware.
Recommended Hardware & Hosting
Build your homelab with hardware tested and used by our team.
Affiliate links — we may earn a small commission at no extra cost to you.